Tuesday, August 7, 2012

Learn How To Make This Beautiful Wedding Arbour


Elegant Wedding Arbour


Sue Bowler
Wedding Arbour - by Sue Bowler CBA


So what is an arbour? By definition, it is a shady garden alcove with sides and a roof formed by trees or climbing plants over a wooden frame. My wedding arbour above gives you the same sense of a garden frame but with the elegance of light and airy balloons, silk flowers and soft organza.

So what is its purpose? An arbour such as this could be used as the focal point at the wedding ceremony, if you search "wedding arbours", you will see that there are so many different styles - is this an area of decor that you are missing out on?


Product List


39286 - Just Married ARP* Diamond Clear 5” 
39208 - Just Married ARP Diamond Clear 11”
43552 - Diamond Clear 5”
43597 - Pearl White 5”
43788 - Pearl White 11”
43603 - Metallic Silver 5”


99326 - Magenta 5"
43960 - Silver 260Q
22932 - Pearl White 160Q
Organza Ribbon
Silk Flowers


* ARP - All Round Print

Method of Construction


The easiest way to make this design is to start by making all 4 columns first; please note that the 5” balloons listed above are a random selection and not a formal pattern: please also note that the Magenta balloons are double stuffed with Silver over the top to create this very soft colour. Starting from the base of each column, work upwards: 


TIP: I always recommend that you 'wrap' you poles and any frames that you are working with using the same colour of balloons that you are putting on to the frame. I use either 260Q/ 350Q when I wrap, or 646Q to stretch over.

Cluster 1. 5 x 5" Inflated to 3"
Cluster 2. 5 x 5" Inflated to 4"
Cluster 3. 5 x 5" Inflated to 4.5"
Cluster 4. 5 x 5" Inflated to 4"
Cluster 5. 5 x 5" Inflated to 3"

This creates a really nice shape, a little different from the usual graduated style.

You now need to add:

4 x 260Q Silver
4 x 160Q Pearl White

You will need to decide how much of the pole you want to cover with this double spiral, personally, I would tie a scrap of 160Q on each of your poles to determine this point to ensure that they all the same!

Start the spiral by using the 4 x 260Q Silver and wrap these around the pole. 

To create a double spiral you need to add the inflated 160Q at the same time as the 260Q but wrap them individually once you have created the first spiral with all the 260Q.

You are now going to add a further three clusters:

Cluster 6. 5 x 5" Inflated to 4"
Cluster 7. 5 x 5" Inflated to 4.5"
Cluster 8. 5 x 5" Inflated to 4"

Now create a second double spiral, and take this spiral up to 6" - 15cm from the top of each of the poles.


You are going to repeat the same cluster format as clusters 1 - 5, however you cannot add these clusters until the top arch frame is completed and added onto the columns, as part of this cluster series is on the pole and the other half on the arch frame

The easiest way to make the arch frame (top part of this design) is to make it up on the floor prior to adding to the four columns!

You can use aluminium rod or a plastic conduit, just make sure that it fits into your poles.

Determine how big your arbour needs to be and this will determine how long your rod or conduit needs to be allowing enough extra to secure to the poles, aluminium rod can be purchased in different lengths, 4m usually being the longest.

Sue Bowler
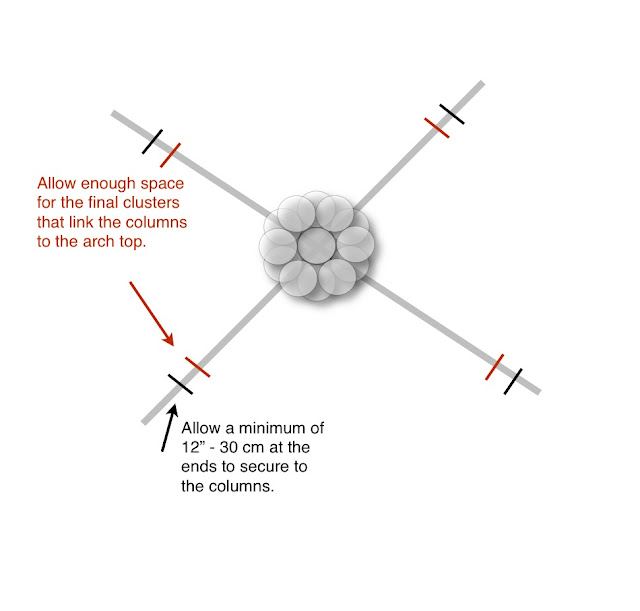
Lay your aluminium rods or plastic conduit on the floor and cross them over at the centre, see diagram below.


Mark the place at the ends of each of the rods to indicate the point at which the frames will be added/slotted in to your columns (most column poles are hollow, so it is easy to slot in your rods, if they are not hollow then you will need to secure the rods to the outside of the poles using duct tape), I would allow a minimum of 12" - 30 cms to make sure that it fits securely. Do not worry about bending your rods to create the arch as this will naturally happen when each of the ends is slotted into the columns. You will need to add a second mark (I have indicated this in red), this is the point where your repeat cluster (1-5) will finish, you will probably find that it will be the last two clusters that will extend onto the arch top, once you have made your marks, you can add the final spirals.
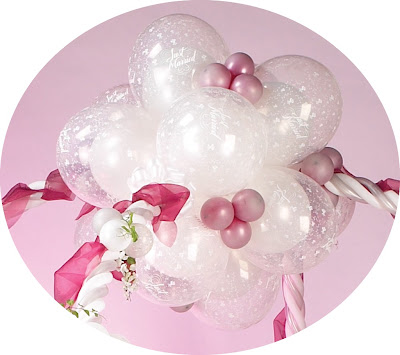


The spirals on the top part of the arbour are only single spirals using 2 x 260Q Silver and 2 x 160Q Pearl White,  I felt that the double spiral would be visually too heavy. Depending how big your arbour is going to be, you may need to only 1 set or if bigger 2 sets, if you use two sets then fill the connection join with a cluster of 5" balloons inflated to 3".


In the centre of the arbour, I have added a double bubble topiary ball using 12 x 11" Diamond Clear with 12 x 11" Pearl White.
Sue Bowler
Double Bubble Topiary Ball 


Add the topiary ball at the centre where the two rods cross over... you just push the ball into position.


Add Organza, ribbons and silk flowers to the arch top, but I recommend that you add all this detail before you position the arches into the columns. I have also used 5" Magenta inside 5" Silver to add a little more detail. I created under-inflated 'Bubbles', made up into clusters of three as accent colour and detail.


You will need a minimum of two people but ideally four people to lift the top into position. Carefully slide each rod into the column and secure with duct tape. 


Add the remaining clusters to each of the columns (repeating clusters 1-5 to complete the design. 


Now finish the design by adding organza, silk flowers and the three balloon clusters to each of the columns to complement the arch top.
Sue Bowler
Accent detail - organza, silk flowers and a balloon bubbles.


Well, this has to be one of the hardest designs to 'recipe'... even though it is actually quite simple to make!

Happy Ballooning!


Sue


Monday, July 30, 2012

Money Money Money... Gift Ideas!

Tim- Perfect Touch Balloons
When I ran my balloon business some years ago, I remember being asked if I could put money inside a balloon or several balloons... I have even been known to put an engagement ring inside a balloon too - twice!

So when I was asked recently if I had any ideas for 'money in balloon gifts',  I thought that it would be great to see what other balloon professionals do when they are asked to put money or gifts inside balloons!

Money Balloon - Soo Wheeler CBA


"We get asked to put money and gifts into balloons. We usually use our stuffing machine and get a jumbo paperclip to hold the money.We have also enclosed gifts such as earrings and necklaces and the good old way of bottle of bubbly and teddies  for new babies.At christmas we also empty a tin of quality street or roses (chocolate candy) into the balloons for xmas stockings!" - Soo Wheeler, Party Buds, UK.


Hee Eun Park


 Hee Eun Park sent me some of his great idea's!
"I made these balloons w/ candy in them.  You could easily put money in them instead of the candy or do both."


Doris Kristin Herzog

Doris Kristin Herzog of Ballonkunst Herzog, Germany, shares a selection of her great money in balloons design ideas! 


Ko Minderhoud CBA
Ko Minderhoud CBA of Balloon en Ko, Netherlands, creates this beautiful 'Money Tree'. Ko told me that he used this same great design when he took his CBA Exam- not real money on that occasion!


Carol Denison

Carol Denison of Balloon Occasions , shared this unique idea. She has placed the money inside the 646Q Diamond Clear balloon (you need to look closely to see the 646Q), so that even when the money has been removed the recipient still has a balloon arrangement!


Alissa from Balloons Delivered Australia shares her 'Money Topiary'

Alissa says "If you look closely at the topiary I made it using a ribbon money chain."

Gemma Rich CBA
Gemma Rich CBA of Perfect Party uses Bubble Balloons which she personalises and creates the ideal money in a balloon gift!

Carlina Thomasson
Another lovely personalised Bubble balloons this time from Carlina Thomasson

Sharon Farrant told me "there is £50 split between these two balloons. Some I put inside the baby balloons leaving just one £5 visible they have to pop them all" - see below.

Sharon Farrant
Shirley Johnstone

Shirley Johnstone has created these beautiful 'Money Butterflies', which she has placed inside an 18" Stuffing balloon.

If you 'Google', 'folding money to make gifts', there are some really great ideas, some of them quite easy the others a little more complicated, but I am sure with practise you could become an expert money folder and why not add a 'new string to your bow' of skills that you can offer!

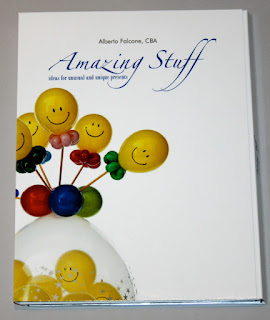
If you are looking for new 'Stuffing' balloon inspiration, there is a great new DVD by Alberto Falcone CBA called 'Amazing Stuff'. Alberto's idea's are super cool and super sellable too! For more information and distributors visit www.albertofalcone.com

Amazing Stuff - by Alberto Falcone CBA
A huge thank you to all those who very generously sent me their ideas and pictures for this blog!

Happy Ballooning!

Sue
www.suebowler.com

Thursday, July 26, 2012

How to create a business Facebook page... and a few of the rules that you may not know about!


I have been working on Facebook page's for over 2 years now, but I still get confused about what you can and cannot do on Facebook!

Here are just a few tips on how and why you should create a Business Facebook Page...


Let's start by looking the different Facebook Pages:

Facebook Profile - this is where people ask to be your friend and you have to accept them as a friend.
Profiles (timelines) are for personal, non-commercial use only. They represent individuals and must be held under an individual name. 

Facebook Groups - This is where people ask to join a group.
A Facebook group is a page created for an organization or business to promote activities. Users can join the group and post their thoughts on a wall and interact through discussion threads. 

Facebook Business Pages - this is where people can 'like' a page.
Pages are for professional or official use, and allow an organization, business, celebrity or band to maintain a presence on Facebook. You may only create Facebook Pages to represent real organizations of which you are an authorized representative. 

A business, must use the business Facebook page option, but many people have mistakingly set up a business profile on a personal Facebook profile - you can easily convert your personal account to a business Facebook page, I have added a link here - Facebook Link, this link gives further explanation as to why you should convert your personal account if you are using it to promote your business and how to do it.

I recently felt that I was probably breaking a few Facebook rules with my personal Facebook page, advertising courses and promoting DVD's, so instead of waiting to be told off or even worse having my page removed by those lovely folk at Facebook, I decided to create my own business Facebook Page, still called Sue Bowler as I use my name to trade under

Here are my 2 Facebook pages, the first is my personal Facebook profile and the second one is my Business Facebook Page.


This is my personal Facebook profile.


This is my business Facebook Page
So now I am trying to use each of my Facebook accounts correctly, however trying to get my 'friends' to move over and 'like' my new page is a hard task... if I find any great tips or techniques I'll let you know! But I know that I can now successfully run a professional business page as well as a friends page!

I really do not want to make this a long and hard to understand blog, so I'll will just give you a few tips on what you can and cannot do on your Business Facebook Page:

1. Make sure that your business profile photo is professional, use your logo or another picture that people associate with your business.

Here is Coca-Cola's business profile photo -

2. Chose a cover photo that represents your brand and showcases your products or services, it is the first thing people see - again I have use Cola-Colas to give you an idea on a good clear cover photo.


What you can NOT include in your cover photo (these are the Facebook cover guidelines as stated in the Facebook help centre)
  • Price or purchase information, such as “40% off” or “Download it at our website”
  • Contact information, such as web address, email, mailing address or other information intended for your Page’s About section
  • References to user interface elements, such as Like or Share, or any other Facebook site features
  • Calls to action, such as “Get it now” or “Tell your friends”
Basically the cover image is provided to inspire and connect with your fans. It is not meant for blatant self promotion or hard sales.
Make sure you have legal copyrights to all images and content.

You can Highlight Posts. 

You can set any post to be highlighted which means it will take up both sides of the page.  This feature enables you to bring special attention to a particular post within your timeline.
I had a look around a few of the more prominent business pages and some of use the highlight feature a lot and others don't use it at all? Check out Pepsi's page to see how they use this feature:


Pinned Posts.


You can set a post to be pinned to the top of your page (if you look at the Starbucks pinned picture above you will see a little gold pin in the top right corner). Pinned posts will stay on top of your timeline for up to 7 days. If possible, try not to wait the full 7 days before you change out the post unless you have a very important message to share. Chances are you have repeat visitors coming to your page throughout the week. Give them something new and fresh to check out. When I was looking for an example of a 'pinned post', some companies use this feature and other don't, so you will need to work out what will work for you and your business, but everything is worth trying at least once!
I think this is enough to get you started, but if you need any help you can always email me at sue@suebowler.com, I may not know the answer, but I will certainly try and point you in the right direction :)
I am now going to try and work out how PINTEREST works? I have read some great things about it, I have even set up an account and pinned some pictures, but I have no idea what I am doing!!
Happy Ballooning and have a great summer!
Sue
www.suebowler.com

Thursday, July 19, 2012

How to design themed air-filled balloon centrepiece design - Christmas theme

I love designing centrepieces, I think that I have mentioned before that I prefer designing on a small scale rather than large scale... although, I think that it was Tope Abulude CBA who suggested treating all projects in 'bite sizes pieces' and just keep adding elements to create large scale decor, which I think is great advice!

It is time to for us to get creative and look at all the different ways we can create exciting designs & decor working with air-filled balloons rather than helium filled balloons for our forthcoming events. 

Before we can start to design our centrepiece designs we need to understand our clients needs and wants...

Sue Bowler
Design created by Sue Bowler CBA

THE CLIENT

Be professional and enthusiastic, it will give the client confidence in your ability to create a fantastic atmosphere at their event.

Find out as many details as possible regarding the event including: the venue, what the occasion is, previous decor and themes, anything that may help you in designing your centrepieces.
From the size of the event, the venue and the entertainment, you should be able to estimate approx. the size of budget that they should be prepared to  spend.
Take notes when you meet up with your clients, this will help you when you are putting together your quotation and shows your professionalism.


WORKING WITH A THEME

This is the perfect opportunity for 'thought showers'... let me show you what I mean!

We will use a very common theme CHRISTMAS, 'easy' I hear you say... or is it!

The first thing we need to do is break our theme down into different categories:

Traditional: Xmas trees * Snowmen * Father Christmas * Rudolph * Carol Singers * Holly * Wreaths * Candy Canes * Xmas Pudding * Xmas Stockings.
Traditional Religious: Angels, North Star, Candles
Modern: Boxes, Baubles, Lights, Crackers
Elegant: Stars, Snow, Snowflakes, presents, crackers, candles
I am sure that there are many more ideas and suggestions that you may have to add! 

Great, now we have worked out the different ways that Christmas can be interpreted from traditional through to elegant, we now need to consider the colours that we can associate with each of the categories 
 Traditional: Red, Green, Gold
 Traditional Religious: Gold, Blue, Green
 Modern: Purple, Gold, Silver, Red
 Elegant: Gold, Silver, White, Clear

The final part of this process is to put each element with the ideal colours:

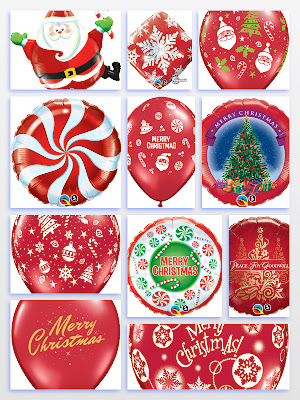
REDFather Christmas/ Santa, Baubles, Christmas Stockings, Holly Berries, Candy Canes
Sue Bowler
This 'mood board' shows a range of 'Red' Qualatex balloons that depicts  'Traditional' Christmas.
GREEN: Christmas Trees, Holly, Wreathes...

Sue Bowler
This 'mood board' shows a range of 'Green' Qualatex balloons that depicts 'Traditional ' Christmas

GOLDStars, Boxes, Candles, Baubles

Sue Bowler
This 'mood board' shows a range of 'Gold' Qualatex balloons that depicts 'Elegant' Christmas.


I repeat this process until I have looked at all the elements and all the colours. I am really only looking for one or two ideas to interpret within my theme, working with the colours will really help with your selection.

Mood boards like the one's I have created above are a great way to show off your ideas to your clients, it truly shows your skills as a designer.

To see the full range of Qualatex Christmas & New Year 2012 balloons download the seasonal catalog now... click HERE to download the right version for your country.

US version


European version

THE DESIGN
Now I have all this information, I am able to present different ideas to my client that I know will excite and fulfil their needs!

Size Matters – The first thing to consider is the size of the table you’re working with. From large dining room tables, to folding banquet tables, to round tables, the size is going to dictate how much or how little space you have to work with, or fill up. Your centerpiece arrangement should be proportional to the size of the table. 

Don’t Be One-Sided – Remember your guests will be sitting all the way around the table so make sure your centrepiece is pretty from all angles. A design should only be front facing if you are positioning it on a front facing buffet table and in this instance this would be more of an arrangement than a centrepiece.
Height rules - remember the 14" centrepiece rule (can the guests see across the table)? You could create the most stunning design, however, if it obstructs the visual line and guests cannot see each other, you can bet that the centrepiece will be removed and sadly placed on the floor... I have seen it happen and often at balloon events!

Is it strong? - is your design strong, well constructed and easy to transport? Does is contain enough weight if you are attaching helium balloons to it?

Have you fulfilled your customers needs? - Have you created a design that excites your client?

Here are 2 air-filled centrepiece designs that could both be used for a Christmas theme party.... both very different!

Sue Bowler
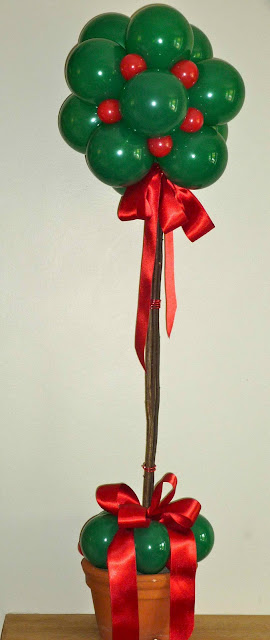
Design 1.
Design 1. Traditional Christmas design
This design is made up of:

  • 17 x 5" Green balloons
  • 15 x 260Q Red balloons
  • 1 x Flower pot
  • small square of floral dry foam 
  • 5 x wood sticks (collected from my garden)
  • 2m Red satin ribbon
  • 30cm Red Wire (optional)
Sue Bowler

Just add up the cost of these materials... not very expensive I think you'll agree!

Sue Bowler
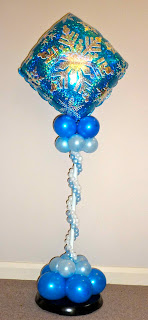
Design 2

Design 2. Modern Elegant
By contrast to Design 1, this design uses the 'new' Snowflakes Sparkles Blue... with a Holographic finish that adds a beautiful sparkle effect! This design would be suitable for an elegant Christmas event that wants something different from the more traditional Christmas decor.

This design was made up of:
9 x 5" Pearl Sapphire Blue balloons
9 x 5" Pearl Azure balloons
18 x 5" White balloons (I have used these to double stuff the Sapphire & Azure 5")
1 x 160Q Pearl Azure
1 x 160Q Pearl White
1 x 350Q White (to cover the black pole)
1 x Snowflakes Sparkles Blue #40089

Base and pole - I have used an IKEA 'Not' base and 2 sections of the pole, you could use Lomey or other alternatives, a long as they are heavy enough to be stable on a table.

Although I have used the theme Christmas for this blog, this same technique can be applied for any theme, and the two designs I have shown here can also be adapted to suit any theme, just by simply changing the balloon colours and the accessories.

Qualatex Christmas Business  Booster

Have you checked out the latest Qualatex Business Booster filled with some truly inspiring ideas for Christmas!
Is it too early to be thinking about Christmas... certainly not! Take this opportunity to be prepared and show your customer your range of exciting design ideas for Christmas... even without helium you can make fantastic decor with great impact!

Happy Ballooning!

Sue
www.suebowler.com

Sunday, July 1, 2012

Happy Birthday 'The Very Best Balloon Blog'

This weeks see's our first birthday... yes, it's a whole year since I published the first ever 'The Very Best Balloon Blog!

Sue Bowler


So, it is very fitting that this blog should be all about blogs! 

I would like to start by talking about the benefits of writing a blog:

They are search engine-friendly and one of the easiest, fastest and least expensive ways to increase the online exposure of your business.
Blogs, are fast and reasonably easy to create. They are less formal than a newsletter. They are interactive, and they are loved by the media as well as by search engines (particularly Google) love blogs.
Blogs make your site “stickier” and more likely to be revisited by prospects looking for fresh, interesting content.  Google will re-index your site more frequently (meaning new pages you put online will appear in the search results more quickly) and it will also give your rankings a boost.... and we all want that!
(‘Sticky’ is a word used in web design, online marketing and search engine optimisation to describe a site or page’s ability to hold an internet user’s attention. The longer the internet user sticks around, the more sticky the site is. Sticky sites are also the sites that attract repeat traffic.) 
There is a great article 7 steps to a stickier website just click HERE for a link, there are other great articles linked to this site!
I suppose it is easy for us all to say that we have not got enough time to write a blog, but from all the evidence that I have read, it is probably one of the best and more effective online tools that you can use to attract greater online awareness for you and your business!

So where do you start if you have never written a blog before?

There are a number of free blog hosting sites, such as  www.blogger.com and www.wordpress.com These are both really very easy to use sites that can help you set up your blog free, with great templates and themes, tools for writing, up to the minute stats, tagging systems and help and advice when you need it... so what are you waiting for!

To give you a little inspiration I have highlighted a few 'balloon blogs' - There are a number of great 'balloon blogs'... sadly, too many for me to feature :(

We'll start with Matthew Lewis Displays - blog. Matt is a regular blogger and keeps his blogs short, fresh and regular... Matt often posts his blogs on the Qualatex Facebook Group page, freely sharing many of his ideas and experiences! 

To see Matts blog click HERE


Here's another great blog! You can already see that it looks so very different from Matt's or "The Very Best Balloon Blog' with a strong black background and white print... this blog is hosted by Wordpress, one of the free sites that I recommended earlier.


I really like this blog, the author known as '007' is in fact David Saker. David has many years experience in the balloon industry and runs a business known simply as Balloon.co.uk. David shares some great stories and offers some truly great tips! I strongly recommend that you read his blog "Small Twitter Tip", if like me you are unsure how to make Twitter work for you, I think this will explain it pretty well... thank you for the great  'Twitter Tip' David!

To view David's Balloon.com blog click HERE

Bunch of Balloons use their blog to show off their AMAZING skills of venue transformation!


I really love the way they explain how they work with their customers to completely fulfil their needs and the attention to detail that they go to making sure that the customers gets what they want and more!

Showing the transformation of a venue is a great way to show off the power of balloons and the art of decor at its best! 


To view Bunch of Balloons Blog click HERE

The last blog that I would like to feature is Miller's Balloon Blog. Once again it has a completely different look from the others. I really enjoyed reading their article on weather and balloons along with their other blogs. The author Jodie, really helps to explain using personal experiences on how to work with balloon in different weather conditions, she also emphasis's how you should have agreements (contract) with your clients should you need to make changes because of the weather!


To view Millers Balloon Blog click HERE

I hope that this blog inspires you to start writing your own, and if you already have a 'balloon blog' and would like others to read it,  please post a link in the comments section below.

Thank you for reading my blog, I really enjoy writing them! If you have any requests for future topics for my blog please let me know, just drop me an email sue@suebowler.com

Happy Ballooning!
Sue 
www.suebowler.com