Showing posts with label elegant balloon decor. Show all posts

Friday, May 13, 2022

Trendy Printed Balloons to add a little Pizzazz to your Decor!

When added to a balloon display, printed balloons can truly bring any decor to life! By simply adding in a few themed balloons, you can easily take an already awesome display to a whole new level! 

Sometimes we look at printed balloons and cannot see beyond what they are. For example, it would be easy to assume that we only use 'cow' prints for children's birthdays and farmyard style decor. However, looking at the decor below proves that we can take a theme and use it in more ways than meets the eye!

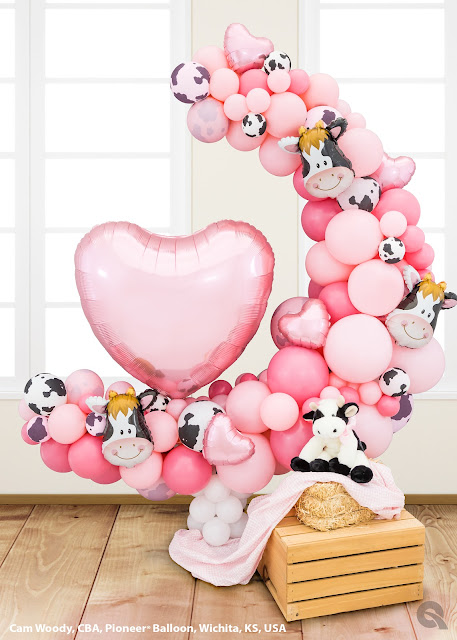
Here is a fantastic example: Cam Woody, CBA of Pioneer Balloon Company has used the Qualatex 11" Holstein Cow print balloon along with some 14" Contented Cow head shapes in her traditional baby crescent moon display, to create this adorable cow-theme baby design... what's not to love about this display! 💕


Over the moon with love!
Dreamy pink paired with cow-theme decor makes for a fun and lovely surprise, perfect for all kinds of occasions.
Designer name: Cam Woody, CBA, Pioneer Balloon Company, Wichita, KS, USA

If you would like to learn how to create a Crescent Moon Frame Shape, check out my blog post: 

Part 1. Baby Moon Design - Step-by-Step Tutorial - How to Make the Frame


Sam Jossie, CBA of Pioneer Balloon Company also used the Qualatex Holstein Cow print balloon in his display, this time the display is a trendy, elegant hoop display for a 30th birthday celebration! He also featured double-stuffed latex balloons to create some fabulous pastel tones that complement the Rose Gold Number 30 and the Taper balloons.


Mooove over for #30!
Celebrate your next big birthday in style with trendy Holstein cow print and customised pastel and rose gold tones!
Designer name: Sam Jossie, CBA, Pioneer® Balloon Company


Holstein Cow
Size and shape: 11" Round
Color: White
Package item #: 11633
Package Count: 50

When it comes to creating Jungle Theme decor, we are absolutely spoiled with choices! We of course can use Safari Assortment with Leopard Spots, Zebra Stripes, Tiger Stripes and Cheetah Spots. We could also use Green Rainbow or Black & White SuperAgate and the Tropical Greenery print too! 


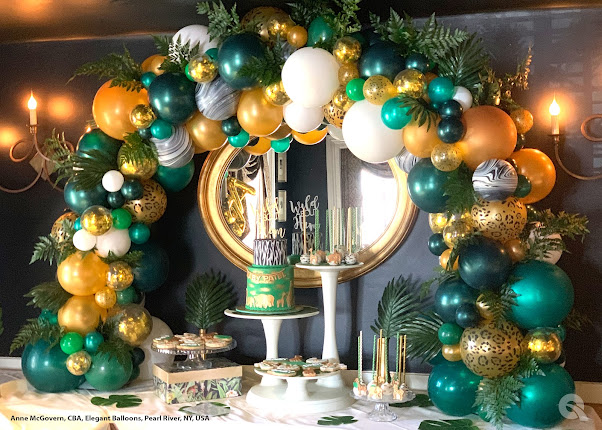
Here is another fabulous example of printed balloons used within a display to create opulent themed decor. Anne McGovern, CBA of Elegant Balloons has added Black & White SuperAgates and Leopard Spots printed balloons to her table Arch, along with some confetti-filled balloons and greenery to create this sophisticated decor! 


Wild About You!
This arch is a natural for any occasion!
Designer name: Anne McGovern, CBA, Elegant Balloons


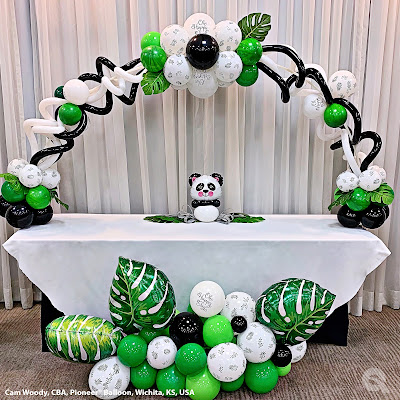
Here is another great example of a table arch. This Panda theme table decor was created by Cam Woody. Cam uses the Tropical Greenery printed balloon to compliment her design with the addition of the 21" Tropical Phildendron leaves! The curly 260Q balloons on the arch gives it great visual movement!


Life is Better With a Panda!
It’s a happy day made better with this lovable bear!
Designer name: Cam Woody, CBA, Pioneer Balloon Company, Wichita, KS, USA.

And finally, I wanted to conclude this post with this fabulous mash up of printed balloons! I would never have thought to do this in a million years, but I love it and I think that it works so well! It's bright, fun and very colourful! Well done Bangin Balloons in Ottawa, Canada.


I must confess, when it comes to printed balloons, I have never really experimented or used a print in a random or unexpected way. Seeing all these amazing designs makes me feel inspired to play more, which I will definitely do once I get my new studio set up and ready for some ballooning action! 

I hope that these designs have inspired you as much as they have inspired me! To read more on this topic, check out the Trends & Themes section on the Qualatex Website;


Happy Ballooning! 

Sue
Follow me @suebowler

Monday, June 19, 2017

Balloons at Weddings — Elegant or Tacky?

Balloon Canopy by Sue Bowler, CBA.

There are divided public opinions regarding balloon decor at weddings. I have actually heard people calling balloons "tacky," and on occasions I can understand why people might think this.

When we walk into a traditional style wedding there is one colour that usually dominates the room — white! White table covers with white place settings or even a white marquee and often held in very neutral venues. So when colours are added into this very pure environment, it needs to be subtle and blended in carefully. 

So how can we make our wedding decor elegant? When I design wedding decor,  it is important for me to keep the decor very neutral. I like to create the majority of my designs using White or Ivory and Diamond Clear balloons. Today, silver is often used at weddings. This can also be considered a neutral colour.


Adding Accent Colour


So when a bride tells us the colours that she is planning to feature at her wedding, think of these as being the accent rather than the dominant colours. Consider using only 5" balloons when adding colour, and simply add just a hint rather than a big block of colour. Another tip is to offer the accent colour in tints, tones, and shades rather than just one single colour. For me, colour blending is more elegant than using one single hue.

To learn more about colour, check out my post: Beginners Guide to the Elements and Principles of Design - Colour.

We are very fortunate with balloons that we can create a multitude of colours simply by putting one balloon inside another to create new and unique colours. This is known as custom colouring, a technique that I love and use very often in my designs. 


These are columns that a group of students made as part of the Complete Wedding — Series 2 Course that I teach in the U.K. and around Europe.


The accent colour in this design is blue, but if you look carefully, you will see that the 5" balloons all vary slightly in colour. This was achieved by using the custom colouring technique mentioned above and therefore creating additional excitement and interest within the design, without the colour being domineering or overbearing.


Here is a chart that shows you how to create some very exciting colours. If you right click on this image, you should be able to save it to your computer.


Wedding Arbour by Sue Bowler, CBA.

Here are two more examples of wedding decor designs where the wedding colour has been added in as an accent colour and also using the custom colouring technique to create the tints, tones, and shades of a single colour. In both of these designs, I used fabric and greenery to add colour and texture to the designs.


Light-Up Wedding Column by Sue Bowler, CBA.
Today, there is a whole revolution of exciting new design ideas and concepts using balloon at weddings! Rose Gold is a colour that is becoming very popular, and in response to this, Qualatex® has introduced a fabulous range of Rose Gold Hearts, Round, and Star shape Microfoil® balloons.


To find out the full range available in this colour, click HERE.

We all love Qualatex Bubble Balloons! These are just perfect for weddings! Ruti Grodzinsky, CBA, of Designed by Ruti — Balloon Decor, Israel, recently created this fabulous decor, combining Bubble Balloons and asparagus fern for a beautiful, elegant wedding. I love the simplicity and elegance of Ruti's design, and I am really loving this Bubble and greenery look!

I recently published a post - Look at Colour Trends for Spring 2017. This shows some other great examples of this new greenery trend with balloons.


Keeping the colours subtle and reacting to trends is a great way to succeed in the wedding market.

I personally believe that balloons at weddings can be extremely beautiful and elegant. Just keep the decor neutral, light, and airy, and keep colours as an accent detail, rather than the main player. 

To promote your wedding services, ensure that you have a good social media presence, especially on Pinterest and Instagram, as they are both very visual and highly used by brides to be!

Happy Ballooning!

Sue
www.suebowler.com 

Thursday, October 31, 2013

Tapertastic! A few ideas to create beautiful balloon decor working with Qualatex Taper balloons!


Sue Bowler
Taper Flowers created by Sue Bowler & friends
 at the Slovenia Event
With Christmas and New Year fast approaching, it's time to start thinking about the exciting decor you can offer your clients for their events!


Recently I attended the Slovenia Event and was asked if I could create decor for the 'opening' festivities. I had very limited time and was a little unsure how many 'helpers' I would have, so I decided to make decor that would have great visual impact but quick and easy at the same time!
(Just to note, I had a great team in Slovenia who helped me to make these awesome flowers... thank you!)


Tuesday, August 7, 2012

Learn How To Make This Beautiful Wedding Arbour


Elegant Wedding Arbour


Sue Bowler
Wedding Arbour - by Sue Bowler CBA


So what is an arbour? By definition, it is a shady garden alcove with sides and a roof formed by trees or climbing plants over a wooden frame. My wedding arbour above gives you the same sense of a garden frame but with the elegance of light and airy balloons, silk flowers and soft organza.

So what is its purpose? An arbour such as this could be used as the focal point at the wedding ceremony, if you search "wedding arbours", you will see that there are so many different styles - is this an area of decor that you are missing out on?


Product List


39286 - Just Married ARP* Diamond Clear 5” 
39208 - Just Married ARP Diamond Clear 11”
43552 - Diamond Clear 5”
43597 - Pearl White 5”
43788 - Pearl White 11”
43603 - Metallic Silver 5”


99326 - Magenta 5"
43960 - Silver 260Q
22932 - Pearl White 160Q
Organza Ribbon
Silk Flowers


* ARP - All Round Print

Method of Construction


The easiest way to make this design is to start by making all 4 columns first; please note that the 5” balloons listed above are a random selection and not a formal pattern: please also note that the Magenta balloons are double stuffed with Silver over the top to create this very soft colour. Starting from the base of each column, work upwards: 


TIP: I always recommend that you 'wrap' you poles and any frames that you are working with using the same colour of balloons that you are putting on to the frame. I use either 260Q/ 350Q when I wrap, or 646Q to stretch over.

Cluster 1. 5 x 5" Inflated to 3"
Cluster 2. 5 x 5" Inflated to 4"
Cluster 3. 5 x 5" Inflated to 4.5"
Cluster 4. 5 x 5" Inflated to 4"
Cluster 5. 5 x 5" Inflated to 3"

This creates a really nice shape, a little different from the usual graduated style.

You now need to add:

4 x 260Q Silver
4 x 160Q Pearl White

You will need to decide how much of the pole you want to cover with this double spiral, personally, I would tie a scrap of 160Q on each of your poles to determine this point to ensure that they all the same!

Start the spiral by using the 4 x 260Q Silver and wrap these around the pole. 

To create a double spiral you need to add the inflated 160Q at the same time as the 260Q but wrap them individually once you have created the first spiral with all the 260Q.

You are now going to add a further three clusters:

Cluster 6. 5 x 5" Inflated to 4"
Cluster 7. 5 x 5" Inflated to 4.5"
Cluster 8. 5 x 5" Inflated to 4"

Now create a second double spiral, and take this spiral up to 6" - 15cm from the top of each of the poles.


You are going to repeat the same cluster format as clusters 1 - 5, however you cannot add these clusters until the top arch frame is completed and added onto the columns, as part of this cluster series is on the pole and the other half on the arch frame

The easiest way to make the arch frame (top part of this design) is to make it up on the floor prior to adding to the four columns!

You can use aluminium rod or a plastic conduit, just make sure that it fits into your poles.

Determine how big your arbour needs to be and this will determine how long your rod or conduit needs to be allowing enough extra to secure to the poles, aluminium rod can be purchased in different lengths, 4m usually being the longest.

Sue Bowler
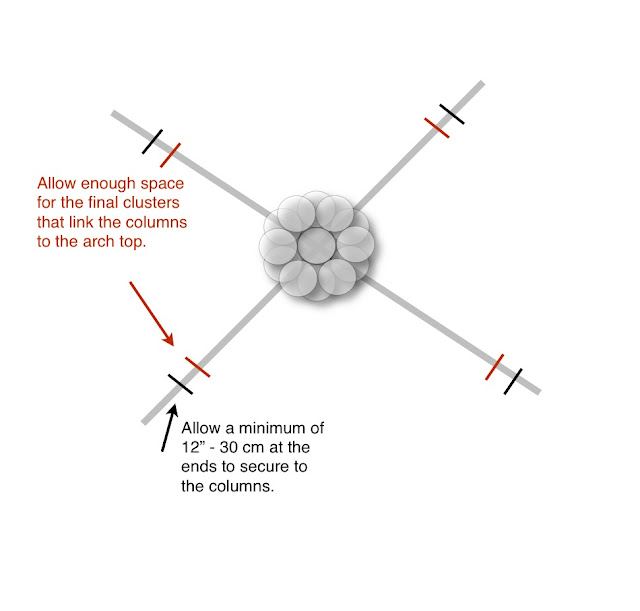
Lay your aluminium rods or plastic conduit on the floor and cross them over at the centre, see diagram below.


Mark the place at the ends of each of the rods to indicate the point at which the frames will be added/slotted in to your columns (most column poles are hollow, so it is easy to slot in your rods, if they are not hollow then you will need to secure the rods to the outside of the poles using duct tape), I would allow a minimum of 12" - 30 cms to make sure that it fits securely. Do not worry about bending your rods to create the arch as this will naturally happen when each of the ends is slotted into the columns. You will need to add a second mark (I have indicated this in red), this is the point where your repeat cluster (1-5) will finish, you will probably find that it will be the last two clusters that will extend onto the arch top, once you have made your marks, you can add the final spirals.


The spirals on the top part of the arbour are only single spirals using 2 x 260Q Silver and 2 x 160Q Pearl White,  I felt that the double spiral would be visually too heavy. Depending how big your arbour is going to be, you may need to only 1 set or if bigger 2 sets, if you use two sets then fill the connection join with a cluster of 5" balloons inflated to 3".


In the centre of the arbour, I have added a double bubble topiary ball using 12 x 11" Diamond Clear with 12 x 11" Pearl White.
Sue Bowler
Double Bubble Topiary Ball 


Add the topiary ball at the centre where the two rods cross over... you just push the ball into position.


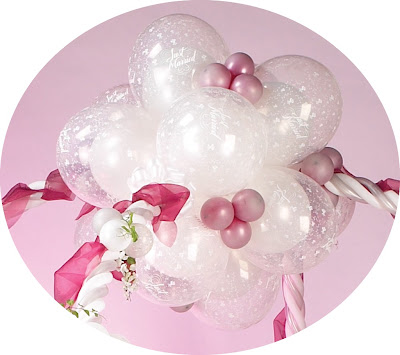
Add Organza, ribbons and silk flowers to the arch top, but I recommend that you add all this detail before you position the arches into the columns. I have also used 5" Magenta inside 5" Silver to add a little more detail. I created under-inflated 'Bubbles', made up into clusters of three as accent colour and detail.


You will need a minimum of two people but ideally four people to lift the top into position. Carefully slide each rod into the column and secure with duct tape. 


Add the remaining clusters to each of the columns (repeating clusters 1-5 to complete the design. 


Now finish the design by adding organza, silk flowers and the three balloon clusters to each of the columns to complement the arch top.
Sue Bowler
Accent detail - organza, silk flowers and a balloon bubbles.


Well, this has to be one of the hardest designs to 'recipe'... even though it is actually quite simple to make!

Happy Ballooning!


Sue


Wednesday, June 6, 2012

A little inspiration for Air-Filled Table Arrangements

Creating arrangements and centrepiece designs working with air rather than helium can appear to be a little more challenging. 

However, there are a number of different idea's that we can successfully use to create great designs every time!

Here are a few inspiring idea's that I have spotted on the Qualatex Facebook Group page!

Anne Cahill McGovern
Design by Anne Cahill McGovern

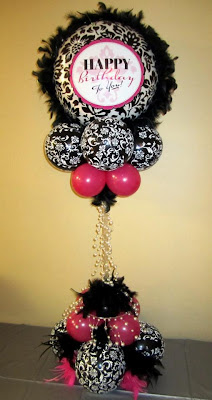
This first design is by Anne Cahill McGovern, and is absolutely beautiful. I love the use of the Birthday Elegant Damask #30986 complimented with the Black Damask 11" latex balloons #33503 (assorted), with 5" Wild Berry. Anne has used a black feather boa for visual texture and movement within the design, along with some added pink feathers and 'pearl' beads. This design for me is fun, elegant, feminine, trendy, fashionable and charming, truly perfect for a birthday celebration!


Nadia   Azar
Design by Nadia Azar
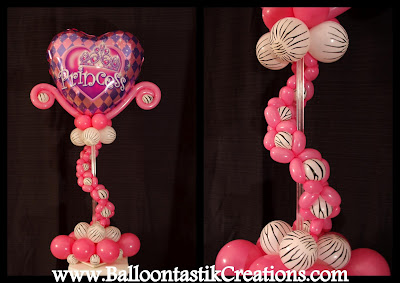
Another truly inspiring design from Nadia Azar. Nadia has very cleverly created this design with a great combinations of balloons. The focal balloon is the Princess Tiara #82027 and complimented with Rose Pink 5, Rose Pink 160Q's and 5" Zebra Prints! The visual lines and movement are very elegant, but this design also evokes a sense of fun and fashion with the use of the animal print, once again perfect for a birthday celebration!


Soo Wheeler
Design by Soo Wheeler

Topiary designs (topiary meaning - ball like shape) also make perfect air-filled centrepiece designs. Above is a beautiful example of a delicate 'Double Bubble' topiary centrepiece made by Soo Wheeler. Soo's topiary creates a feeling of romance, elegance and gentleness, perfect for a wedding or with a slight change of balloons, this same design could be used for a Christening or Baptism celebration. I love the use of the 5" Just Married Flowers-A-Round latex print #39286.

The Topiary technique can be so very versatile, and can be adapted to suit almost any occasion. I have included a few of more of my favourite idea's below.


Laura Serrano
Design by Laura Serrano
 This stunning Magenta 4" Hearts Topiary is so beautiful and elegant, the organza ribbon and cellophane 'picks' compliment this design perfectly. I can visualise this design in many different colours and being used for many different occasions! 


Linda Bruce
Design by Linda Bruce 


Here is another topiary centrepiece, this one was created by Linda Bruce. The design is simple yet elegant, the ribbon creates the perfect link between the base and the top, and the raffia ribbon add's a visual texture to the design.


Balloontime Roma
Design by Balloontime Roma.


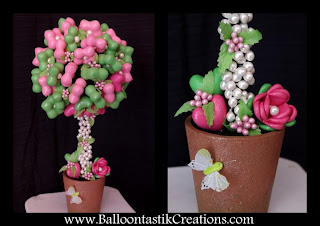
Here is another beautiful example of a topiary design by Balloontime, Roma. Set in a flower pot, it creates the appearance of a flower or tree. The soft colours would indicate this design is for a Christening or a new baby!


Nadia Azar
Design by Nadia Azar


Nadia Azar gives us another great take on the topiary technique. Nadia has used 'puffed' Geo Blossoms... the visual texture is great along with the fresh colours of Lime & Pinks!


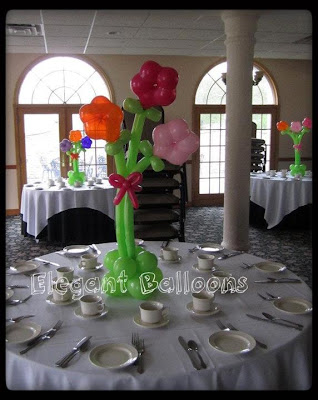
Below is another great air-filled design created by Anne Cahill McGovern... It's so simple but so very effective! The 6" Qualatex GEO Blossoms look great in these arrangements... just 3 on each of the tables and they look amazing!


Anne Cahill mcGovern
Design by Anne Cahill McGovern
Colin Myles
Design by Colin Myles


I had to include this fantastic design by Colin Myles! It is packed with visual movement and line!
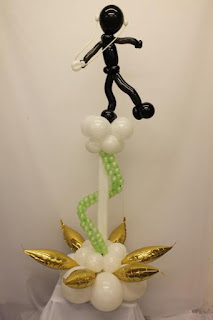
The 6-balloon cluster base gives perfect visual stability, the 13" Taper balloons add a sense of 'spotlight' to the dancer on the platform along with the 'woven' line guiding light and movement up the column and finally the 'music' guy, dancing on his platform... such a fun and clever design Colin!


Jose Lutman
Design by Jose Lutman


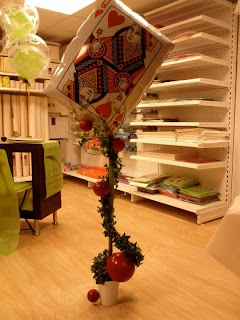
Jose Lutman has a really modern artistic flair when it comes to balloons, I always love to see his ideas and inspirations. I really like his idea of the 'Queen of Hearts' 30" Playing card at the top of this elegant garland of greenery and the simple addition of carefully placed red balloons!

There is a great 'Designer Showcase' of Jose work in APR/MAY/Jun 2012 balloon Images  magazine. 
Images article featuring Jose Lutman

Finally, I cannot complete this blog without mentioning Idit & Hagai Schwartz from Israel, their business is based round centrepiece designs, there is a great article in Images APR/MAY/JUN 2011 called 'Center of Attention'. Idit and Hagai's work is creative, elegant and inspiring, all the designs featured in the article are air-filled... and very beautiful!

Images article featuring Idit & Hagai Schwartz
I have really enjoyed gathering designs for this blog, it has been wonderful re-visiting many of the photographs that have been generously posted and shared on the Qualatex Facebook Group page. I would like to say a huge thank you to all those I have featured in this blog, your continuous idea's and techniques are a great inspiration to us all!

Happy Ballooning!

Sue
www.suebowler.com


Friday, December 16, 2011

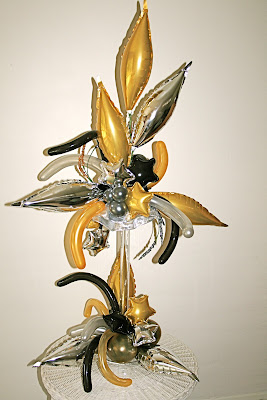
An elegant centerpiece idea for a New Year's Gala Party!


Sue Bowler
Picture 1
I was recently looking back through some of my photographs and came across the centerpiece that I designed and created for the Gala Party at the World Balloon Convention 2010.  I thought that this design would be perfect for an elegant New Years celebration party! 


I would like to clarify at this point that the design you can see in picture 1 is not the final design that I used, this was the first of a few that I created during the design process and as you can see this is not a centerpiece, more of an arrangement! Why... because there is no visual gap between the base and the top elements, which means that if I was to put this in the middle of a table, the guest would not be able to see each other! But this picture shows clearly both the base and the top designs, which is why I have used it in this blog!


Celebrate New Year Sparkle # 99797 34"

Looking at the fantastic range of Qualatex New Year's Microfoil and latex balloons available I can see how this design would really work well for a New Years party! The color palette is Black, Gold and Silver, Stars and Swirls are the main design element that repeats throughout most of the New Years balloons, allowing us to create unity.

Rather than teach you how to re-create this design as shown above, I thought that I would take you through each of the elements step-by step, you can then decide if you would want to make the whole design or maybe just part of it, which is what we did for the World Balloon Convention.

There are quite a few different elements that make up this design.

Picture 2
I started with a Lomey dish base, this is a product made by Smithers Oasis, many balloon distributors sell this and other Smithers products. I then secured a square of DRY floral foam using a cool glue gun.
TIP 1. Do not be tempted to use too much floral foam, the more you use, the more you have to fill or hide!
Picture 3
Talking about hiding the mechanics, I knew that this may be a problem, so I started by creating a 'skirt' of fabric around the edge of the foam before I even started to add any elements. Try using a fabric that has a finished edge rather than a 'raw' edge that may fray and look untidy. This fabric is also a Smithers product and has a lovely metallic look. I used floral 'reel' wire to gather up the fabric and then pulled it into the dry foam, I did not need to use any glue! If you look at Picture 1, you will see that I used a Silver fabric for the base cover.

Picture 4
Now I added in the 13" Tapers (these balloons need to be heat sealed, if you are unsure how to do this see Tip 2 below). These were placed in different positions. Picture 4 represents the base design and Picture 5 is the top element. If you were going to only create a base design, you will need to work with Picture 4 as the Tapers in Picture 5 would make your design too tall for a base - 
Remember the 14" height rule!
Picture 5


To secure the tapers into the Dry Foam, I used Premium Balloon Cups-N-Sticks. If you can get the clear one's these are perfect!

The Tapers create the visual line of the deign creating both horizontal and vertical lines and are the main focal point, all the other elements that we add are known as 'accent elements' and should compliment the design and not compete!


Picture 6


Picture 7


The first of the accent detail is adding in 4" Microfoil Stars, picking out all the colours in the design. If you currently do not use these wonderful little balloons you should! They are for me what really makes our centerpiece work amazing. They can be prepared well in advance as they will last forever!


TIP 2. If you are unsure how to heat seal the small Microfoil balloons then visit my earlier blog - Heat Sealing Qualatex Microfoil Balloons!

Once again I use Premium Balloon Stems and Cups-N-Sticks to position them into my design. However, if I remember correctly, on the day of mass production, I think that we started tying the stars into groups of 3 and then used a floral wire 'pin' to secure the cluster in position.

Pictures 7 & 8 shows you how I placed the stars for best effect.

Picture 8


Picture 9


I love the technique shown in Picture 9, it is still all balloons, but allows us to create some beautiful lines within a centerpiece! What you need to do is take a 260Q, remove the bead or lips, then take a floral wire 18 gauge or 1.02mm wire- try and get the longest wires possible and plastic coated too, otherwise the steel can get rusty and you will need to clean them before you use!
Bend the very tip of the wire over using a pair of 'Pinch Nose' pliers and then wrap the bent tip with a little floral tape. Now gently pull the 260Q over the wire, using the removed bead you can secure the 260Q to the wire at the tip. Now 'scrunch' the 260Q by pushing it up the wire, see Picture 9 then use a little floral tape to hold the balloon in position. I used 3 of these together to create the elements in Picture 9.

Picture 10
I also used 160Q's and 260Q's inflating the tips only (Picture 10) , using the warmth of my hand bend these into curves, again to create elegant lines within the design.


Picture 11
Position both the 260Q 'Scrunchies' and the 160Q & 260Q 'Curves', into the design, look back at Picture 1 and see how these elements create fantastic visual movement.


Finally, I added 2 x 3-balloon clusters of under-inflated 5" (one on each side), which I double stuffed to create a really intense metallic color! The 'Silver' balloon are Black inside Silver and only inflated to approx. 2", be careful not to make them too big!

Picture 12

This is not the easiest of designs to explain or create, but there maybe some ideas and techniques that you can use to make yours!  I hope that you have some great bookings for the New Years celebrations! Good luck!
New Years Sparkle # 27673 18"

With seasonal best wishes!

Sue 

The tools that you will need:
Floral Tape

18 Gauge or 1.02mm Floral Wire

Pinch Nose Pliers

Reel Wire