Showing posts with label Step by Step design. Show all posts

Thursday, January 26, 2023

Air-Filled Design idea using PremiumConwin DecoCup™ + DecoStick™

With the continually soaring cost of helium and its lack of availability, finding air-filled solutions is extremely important to the ballooning community.


Creating designs using the PremiumConwin DecoCup™ + DecoCup™ is definitely the way forward, and today, I would like to share two videos with you featuring those accessories.


It's all about the Base! 

In the first video, I will demonstrate how to create the central support for your designs. I have two methods:

1. Using a tile base with 2x DecoCups and 1x DecoCup

2. Using a sand-weight with 2x DecoCups and 1 x DecoCup

I show two different glue options to secure the DecoCups to the tile base.

If like me, you have unused Lomey Adhesive in your toolbox. 
 This works very well for sticking a DecoCup to a ceramic tile base, 
but it can take up to 24 hours to dry! I recommend using packing tape to hold the cup in place on the tile during the drying process.


Gorilla Glue works extremely well when you need to stick two items together that are made from different material. The down-side is the drying time as it can take up to 24 hours for the glue to bond successfully.

Sand-Weights - using kiln-dried sand
A sand-weight makes the perfect weight for a base, unlike a water-weight, a sand-weight can be moulded into shape and flattened and is very stable, it is also quick and inexpensive to make. 

Check out the video below to see how easy it is to make the base element for our air-filled designs.


"With Love" - air-filled Hat Box Valentine's arrangement 


In the second video, I show you how to create this relatively easy design that would be perfect for Valentine's Day or by simply changing the balloons and colours it would be suitable for any occasion!

For this design I have used:

  • Hat Box
  • 7" Qualatex Gold Chrome
  • 5" Wild Berry
  • 260Q Gold Chrome
  • 260Q Wild Berry
  • 260Q Rose
  • 18" Love Gold #16766
  • Pink Organza Ribbon
  • Uglu Dashes 
Check out the video below to find out step-by-step how to make this great design.


I have been creating air-filled balloon designs for many years now, and I have come to have a preference to air-filled over helium-filled designs. I feel that an air-filled design allows for more creativity and detail, and I prefer the end results!

Here are a few more of my air-filled arrangements, some using Deco Cups and Sticks.

The Happy Birthday foil in this design is actually helium-filled, but it could easily be replaced with an air-filled version on a Deco Cup & Stick


I hope that this post has been helpful and given you a little inspiration!

Happy Ballooning!

Sue
Follow me @Suebowler


Monday, January 9, 2023

Step-by-Step Air-Filled Valentine's 'Love' Arrangement by Sue Bowler

'I Love You with Love' is a design that I created last year for the Qualatex Online Education video program that is available on Vimeo, called Expressions of Love! Today I am sharing one of the designs from that program.


This year, with the continually soaring cost of helium and its lack of availability, we will all be looking for exciting air-filled designs that can be recreated quickly, with much of the prep work done in advance, and this design ticks all of those boxes! 

Material List:

58271 7" Gold Chrome
99352 5" Pearl Magenta
59570 16" Northstar Magenta L Shape
59590 16" Northstar Magenta V Shape
59556 16" Northstar Magenta E Shape
16766 18" Love Gold Heart Shape Microfoil™
58283 260Q Gold Chrome
25577 260Q Wild Berry
36336 4" Metallic Gold Hearts

Check out the video below for full step-by-step instructions on how to make this design.


To view the other designs on the video visit https://vimeo.com/ondemand/qualatexlove, or if you are a Rockstar Member of Q Corner you can watch the whole video as part of your membership!

Here are some more inspiring design ideas using a similar style and techniques.


All my love to you!
This love-filled design is a little extra, perfect for a Valentine!
Designer name: Cam Woody, CBA, Pioneer Balloon Company, Wichita, KS, USA


A New Kind of Love Letter…
What better way to show your love than with love-letter themed balloons?
Designer name: Eve Antonello, CBA, Pioneer Balloon Company, Wichita, KS, USA


Love is Golden
Do something a little different for your love!
Designer name: Cam Woody, CBA, Pioneer Balloon Company, Wichita, KS, USA


Together Forever, and Ever
Make a statement with this design!
Designer name: Cam Woody, CBA, Pioneer Balloon Company, Wichita, KS, USA


Gnome body loves you as much as I do!
Designer name: Julie Dunham, CBA, Pioneer Europe Ltd.

 
And don't forget, Qualatex has a great selection of FREE marketing materials available for you to download that will help you to promote your Valentines campaign, as well as other seasonal events! 

Facebook Cover Photos

https://us.qualatex.com/en-us/inspiration/marketing-materials/

Download beautifully crafted cover photos, created by a professional graphic designer at Pioneer, and upload it to your Facebook page.

Ready-Made Social Media Posts

https://us.qualatex.com/en-us/inspiration/marketing-materials/

Qualatex has created simple social media posts using the latest Qualatex bouquets with fun headlines within the graphic. These designs make it simple to promote products with minimal effort on your part.

Qualatex Lifestyle Images

https://pioneerballooncompany.widencollective.com/c/vozhdikn

Many of the lifestyle photos used on the Qualatex social media accounts are available for you to download and share on your social media account!

I hope you find the video and the inspiration helpful! Be sure to use the great resources available on www.Qualatex.com for all your holiday needs!

Happy Ballooning! 

Sue
Follow me on @Suebowler


Thursday, December 8, 2022

Learn how to make a Flat-Pack Christmas Tree - with an easy Step-by-Step Recipe


Balloon Christmas Tree using the Flat-Pack technique

There are so many different techniques when it comes to designing with balloons! Each technique has its own set of pros and cons, and we can use those factors to choose the best technique to suit the decor that we are creating or the location that we are creating it in.

We don't often see the Flat-Pack technique being used. This style of decor is known as Classic Balloon Decor where all the balloons are sized with precision to achieve a  perfect look!  I actually used this technique to create a Halloween design recently at a training event. The pros of using this style of decor is that it is flat, so it can be used in spaces where there is not much depth, like a shop window or a narrow room.

Here is a sideways photo of the same Christmas Tree. The tree is literally only one balloon in depth, making it very slim! 

Side view of the Christmas Tree


I have made a short video that explains how to construct a column using the Flat-Pack technique. This video will be of help to you if this technique is new to you, however, for the Christmas Tree, you will need to follow the sizing on the recipe sheet below for the balloon sizes, but follow the method shown in the video.


Here is the recipe for the tree that I made. You can change the sizing if you want to make bigger or smaller trees. For my design, I use Qualatex® Chrome™ Gold and Chrome Green and topped it with a 20" Ruby Red Microfoil™ Star.

Flat-Packed Christmas Tree Recipe by Sue Bowler

I would like to thank Lynda Webb from Bloon Away Boston in Boston, UK. Lynda attended the training session where I demonstrated the Flat-Pack technique and was so inspired with it that she started to play! I saw Lynda create a number of different designs including a variety of columns, and then she used the column technique to create tree's! I asked Linda to make some Christmas Trees for the recent BAPIA Funday - Christmas with Qualatex and they were a huge success! Lynda asked me to write this post so that we could share the recipe with others! 

Christmas Trees by Lynda Webb - Bloon Away Boston

Happy Ballooning! 

Sue
Follow me @suebowler


Monday, November 28, 2022

How to Make a Christmas Wreath - Step-by-Step Video


Christmas Wreath by Sue Bowler

Karla Bell-Marsh of Blooms and Balloons in Portsmouth and I recently created these five hoops to represent the 'Five Gold Rings' as quoted  in the Christmas song The Twelve Days of Christmas at a recent industry event hosted by BAPIA (Balloon and Party Industry Alliance) and co-sponsored by Pioneer Europe, Qualatex.

The wreaths proved to be a popular sight at the event, so I thought that I would share the design with The Very Best Balloon Blog! 

I've created a step-by-step video showing you how to make the wreath. This same technique can be used with different coloured balloons to create hoop designs for multiple occasions.


Chrome Gold and Chrome Gold Christmas Wreath by 
Sue Bowler, CBA and Karla Bell-Marsh.
The wreath above was made on a larger, 1m hoop. I inflated the outer balloons to 6" and the inner balloons to 5", using the same technique on the video.

Here is a wedding hoop design that I made using the same sizing technique as above. On this occasion, I have added a 6" heart on the second cluster.

Wedding Hoop by Sue Bowler

I will demonstrate how to recreate the Taper Poinsettia in my next post! 

Happy Ballooning! 


Sue
www.suebowler.com

Tuesday, May 24, 2022

Father's Day Inspiration for the 'Best Dad in the World!'

When it comes to designing or buying something suitable for men, I personally find that it takes a little more thought!

Father's Day falls on different dates around the world, however, many of us celebrate it on Sunday the 19th of June, so with that in mind, now is a great time to start our marketing and preparing design ideas to promote and sell.


World's Best Dad Personalised Bubble Balloon by
Fizz and Frills Balloons in Stoke-on-Trent, England


Personalised Balloons are always a huge hit with anyone that receives them. Qualatex® Deco Bubble Balloons™️ are the perfect balloons to create magical and memorable personalised balloons. They are extremely versatile, giving you the ability to add beautiful coloured 5" balloons inside... along with many other things too! Personalised balloons are especially meaningful to the recipient. 

If you are worried about using helium due to the rising costs, a great air-filled alternative would be to use a 30" Premium Balloon Accessories Deco Stick with the Maxi Cup ll. I use two Maxi Cups in this case. I glue one to a base that has a little weight, using a small wall tile works well for this, just ensure that you use some sort of protection on the base of the tile as tiles can be rough/sharp and may scratch a surface when placed on it! 
Inflate the Bubble with air and personalise the balloon as usual. Add the Bubble to the second Maxi Cup and secure to the Deco Stick. Add a small cluster of balloons under the Bubble to hide the cup or maybe add a bow or some tassels. You can also add a cluster of balloons at the base once again to hide the cup. When gluing the Maxi Cup to the tile, make sure that you use an adhesive that is strong enough to hold the cup securely. I have used Gorilla Glue in the past and that dries rock solid, but it does take 24 hours to dry! 

For the younger generation, giving a fun design like this to their Dad would be perfect! 


Dad's The Best!
A PANDASTIC design just for his special day.
Designer name: Cam Woody, CBA, Pioneer Balloon Company, Wichita, KS, USA


This is such a fabulous design that can be used to make many different balloon characters; it's ideal for birthdays and other celebrations. Simply select the animal head balloon that you want to make and use coordinating latex to create the body of the design.

Here are step-by-step instructions:


Here is a Monkey design using the same technique that I made for a birthday. The only difference is that I used a Deco Bubble for the body rather than a QuickLink balloon.

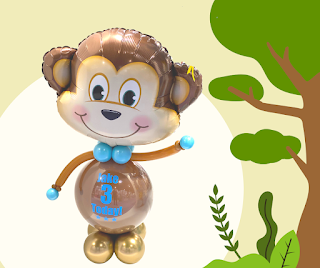
Monkey Bubble Design by Sue Bowler, CBA

Here are some more great design ideas that are perfect for Father's Day! 


Always On Point!
A whimsical design to show dad how awesome he is!
Designer name: Eve Antonello, CBA, Pioneer Balloon Company, Wichita, KS, USA


One Ale of a Good Dad
Cheers to dad on his special day!
Designer name: Eve Antonello, CBA, Pioneer Balloon Company, Wichita, KS, USA


Let's talk a little about marketing...

It is important to get ready for Father's Day ahead of time, and any marketing that you do beforehand serves as a reminder for consumers that Father's Day is coming soon! 

One of the easiest things that you can do is to prepare a cover for your business Facebook Page!  This is a great way to kick start your marketing! 


Maybe try running a Father's Day social media contest! 

The great thing about running a contest is that you create natural customer engagement! 

For example you could compel your followers to share their “favourite dad moment”, “dad image”, or even “dad joke” in a social media contest. Remember to think of a clever #hashtag and associate it with the campaign and get them to use it in their posts (e.g. #mydadiscoolerthanyourdad). Also, encourage them to share the post with their own followers.

Inspire your customers with a gift selection guide!

As I mentioned earlier, buying for a man is definitely harder than buying for a woman! Showing a great selection of balloon designs is vital for a successful campaign. Remember, people not only buy for their dad's, they buy for granddad's, step-dad's first time dad's too! This is where personalised balloons are a winner! It is important to show all the different options that you can offer for personalisation.


One of the best way to get your message in front of a more relevant audience is through Facebook Ads. If you choose to boost a post instead, your targeting options are limited. But by utilising Facebook Ads, you have more advanced customisation solutions such as ad placements, ad objectives, opportunity to add a "call to action" button, and so much more. If you have never used Facebook Ads I can honestly testify that they work and they really don't cost a great deal... you only pay what you want to pay! 

I hope that you have a happy and successful Father's Day! Make sure to try out something new in terms of marketing, and make sure that you measure the results!

Happy Ballooning! 

Sue
Follow me @suebowler 


Tuesday, December 14, 2021

A Very Merry Christmas from Luc Bertrand CBA

Over the years, Luc Bertrand, CBA of WaWballoons in Vichte, Belgium has kindly created and shared a number of amazing designs with the Very Best Balloon Blog so that we can share them with the 'balloon community.' This year he has generously shared his updates to his wonderful QuickLink 'Santa' mural that he made a few years ago! 


Medium Santa Head

This is probably my favourite variation! I definitely need to make one of these! 


Small Santa Head


If you would like to learn how to make the original version - Large Santa Head, click HERE or visit

A huge thank you once again to Luc for sharing his fabulous balloon art with us all! 

Happy Ballooning! 

Sue

www.suebowler.com

Follow me on Instagram @suebowler

Thursday, November 25, 2021

Oh Christmas Tree - Creative Balloon Tree Ideas for the Festive Season

There is nothing more iconic than a Christmas Tree! The tradition of bringing a tree indoors at Christmas time actually began in the 16th century. Today, however Christmas trees come in many forms, including those made from balloons! 

In this post I would like to share with you a selection of inspiring styles of 'balloon trees' that could be used as part of a display or as decor at an event! 

Let's start with a little bit, well actually a lot, of sparkle! What could be more spectacular than Chris Adamo's incredible gold confetti Christmas tree! Confetti-filled balloons are certainly a big hit with customers, and this tree looks simply F-A-B-U-L-O-U-S! 

Design by Chris Adamo, CBA,
 of Balloons Online, Sydney, Australia.


For decorative air-filled confetti balloons:
  • Inflate the balloon with a small amount of air to stretch open the balloon, and then let the air out. 
  • Use the funnel to insert confetti inside the balloon or you can use a balloon stretching tool* to open up the neck of the balloon.
  • Fill the balloon with air to the desired size and be sure to tie the balloon carefully afterward, ensuring that there is no confetti in the neck of the balloon.
  • Check that the confetti is distributed across the balloon, you can use static to get the confetti to stick. If using metallic confetti, you can use Hi-Float as an adhesive inside the balloon before you add the confetti.


This organic Chrome Gold and Chrome Silver Christmas Tree is absolutely gorgeous and beautifully finished with greenery and berries!  
 Zoe Adam-Jones, CBA, of JAZ Trading,
Queensland, Australia

Balloon Mosaic Frame  by Sue Bowler, CBA in Henley On Thames, England

I really enjoyed making this mosaic tree design. The frame itself was so easy to assemble using a Nikoloon Frame kit. I used a combination of Chrome Gold, Chrome Copper and Chrome Rose Gold 7" and 11" balloons. I also added a few Metallic Gold 4", 9" and 18" Stars, plus one single 4" Red Star at the top! As a finishing touch, I created mini bubbles from the tips of Chrome Gold 260Q's. This tree lasted many weeks and looked absolutely fantastic! 


QuickLink Christmas Trees made by Sue Bowler

I made these QuickLink Christmas Trees for the entrance decor for a corporate Christmas party! When I made these, I was very new to working with QuickLinks.I was very grateful to Sean O'Kelly of BalloonDecor, VIC, Australia who shared his design recipe with me and the Very Best Balloon Blog! To learn how to create this tree, click HERE, or follow this link: https://theverybestballoonblog.blogspot.com/2015/08/how-to-make-quick-link-christmas-tree.html

This Christmas tree entrance decor scene was created for a Qualatex Event in France, in 2017
by José Luthman CBA of Ballonrama in Mulhouse, France.
 
These fabulous Christmas Trees were made using partially inflated 260Q balloons, and clearly the effect was stunning! 

Here is another fabulous QuickLink Christmas Tree, designed and created by Glen LaValley, of Glen the Balloon Guy in Edmonton, Alberto, Canada. If you would like to learn how to make this design click HERE or follow this link: https://theverybestballoonblog.blogspot.com/2015/08/how-to-make-quick-link-christmas-tree.html


Designer name: Cam Woody, CBA, Pioneer Balloon Company, Wichita, KS, USA


Here are a few more inspiring ideas from #balloonchristmastree on Instagram

This first design by Rejoice Event Design is simply spectacular! I love all the fabulous twisted tree decorations! 
Stunning White and Chrome Gold Tree by
Rejoice Event Design, New Jersey, USA
www.rejoiceeventdesign.com

White Tree with Red and Chrome Silver accent details by
Little Balloon Box in Bromley, England
www.littleballoonbox.co.uk

This pastel Christmas tree is so elegant.
Design by
The Balloon Crew in Barrie, ON, Canada
https://theballoooncrew.wixsite.com/theballoooncrew-1

And finally, a fabulous collection of Christmas Trees by Dream Higher Events completes the display! 
Design by Dream Higher Events in West Malling, England
www.dreamhigher.co.uk

There are so many different ways to create a Christmas tree from balloons, some being quicker and easier to make than others! Looking at these beautiful designs has definitely inspired me to make a 2021 tree! 

For even more inspiration and ideas, I recommend that you check out #balloonchristmastree.

Happy Ballooning! 

Sue
www.suebowler.com
Follow me @suebowler